
You can design your own badges using your favorite design software like Adobe Illustrator. If you don’t design a badge template, the kiosk will print a default badge made for our standard adhesive backed label media.
If you’re unable to create a badge design, we can create one for you for no additional charge.
Templates
Here are the standard templates for each badge media we support.
Setting up your artboard
The printer will perform edge to edge printing. There is no requirement for a bleed. Set up your Artboard in Centimeters with a DPI of 300 and color palette of CYMK.
If you’re designing for the adhesive backed labels set your Artboard size to 9.53cm x 27.43cm.
If you’re designing for the non-adhesive backed labels set your Artboard size to 9.6cm x 26.8cm.
Artwork
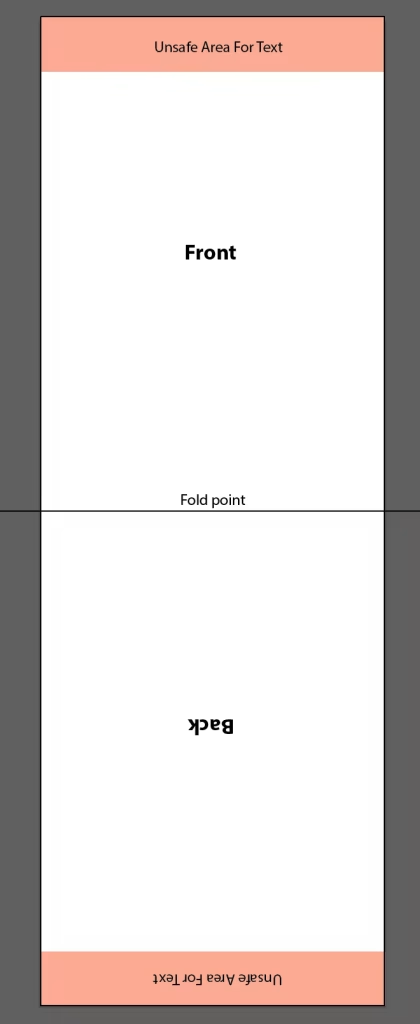
When creating your artwork the top 1.5cm and bottom 1.5cm of the badge is unsafe for any text or logos that you don’t want interrupted. This is because the lanyard holes are located in this area. It is fine to include patterns or unimportant graphics in this area.
Create a rule line exactly half way down (length side) on the badge media. This will be the fold point and the point where the design and information must be flipped 180 degrees.
Note: If you require mirror print where the same design and data is required on both sides of the badge, you only need to design the top half of the template. This is because the kiosk printer software will duplicate and flip the design for you. If this is the case, resize the Artboard to be size to one side only e.g. 13.4cm (non-adhesive backed) or 13.715cm (adhesive backed).
Design Considerations
The following information can be printed variably from the system data and don’t need to be included in the base template.
- First Name
- Last Name
- Display Name (first and last in one string)
- Job Title
- Company Name
- Ticket Number as QR Code
- Ticket Name
- Ticket Entry Date
- Attendee Role (e.g. attendee, speaker, volunteer, exhibitor, staff)
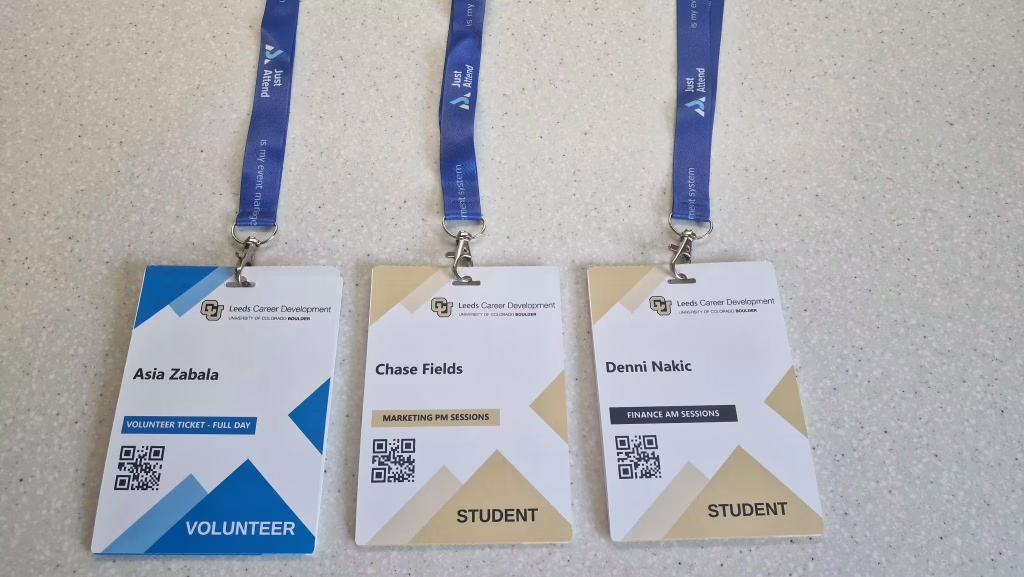
- Event logo
- Exhibitor logo*
- Attendee’s personal agenda**
- Custom role data as text or QR Code (same data printed on all badges of the same role e.g. attendee badges get a discount code for the merch store, exhibitors get a premium WIFI code)
* – This can be printed only if you’re using Just Attend to manage exhibitors. This will not work if you’re using us for badge printing only.
**- This can only be printed if you’re using Just Attend for session scheduling and attendee registration. We recommend you only use this if you know attendee’s personal agenda will be less than 8 sessions in total
Variable data printing
The variable data printing will print the data as found against the ticket holder’s account in our system. There are a few design settings that can be applied to any variable data element
- You can select whether the text data will be printed in regular, bold, or italic font
- You can choose to print the data as inputted or convert it to CAPITALIZED font
- You can choose the color of the text
- You can choose the font family of the text
- You can choose to print the background of the data element in a color
When choosing to print the background of the data element, please note that we are only able to print square or rectangle blocks. We don’t support rounded corners or other shapes. If you require these, you will need to include them in your base design template.
Fonts
You can use any standard Windows font for all data or a different font for each data element. The font must be installed on the check-in kiosk machine in C:\Windows\Fonts. If you’re using custom fonts, these fonts will need to be installed on to each kiosk machine.
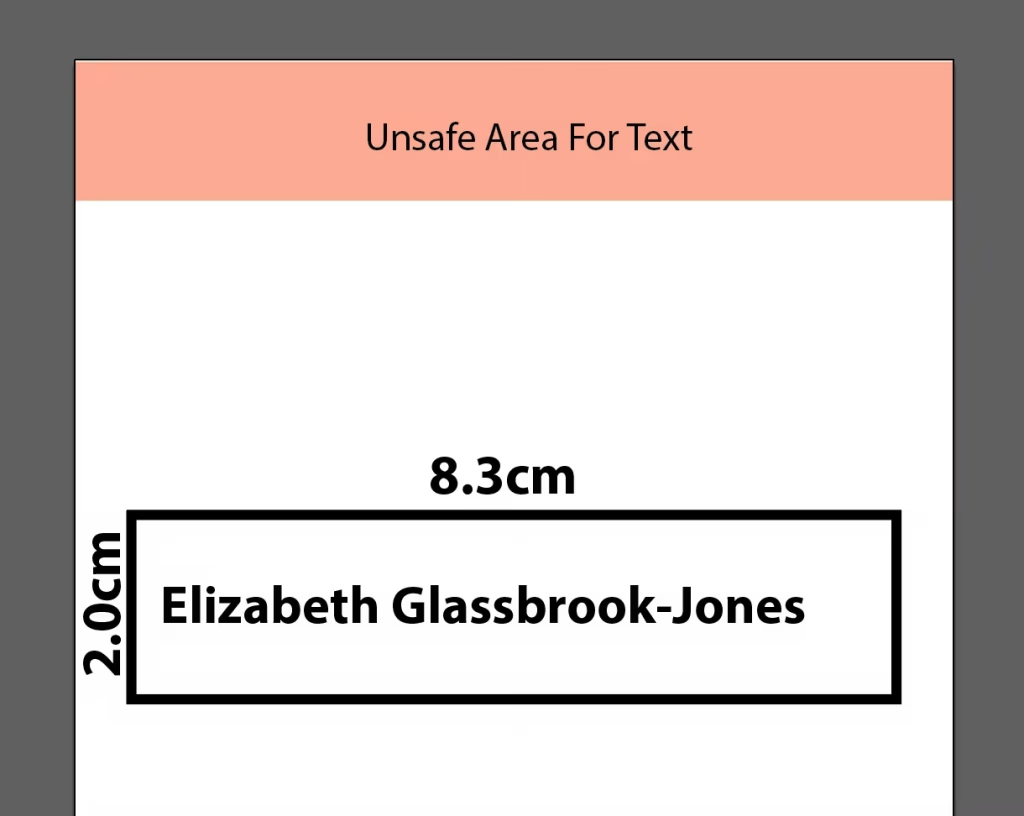
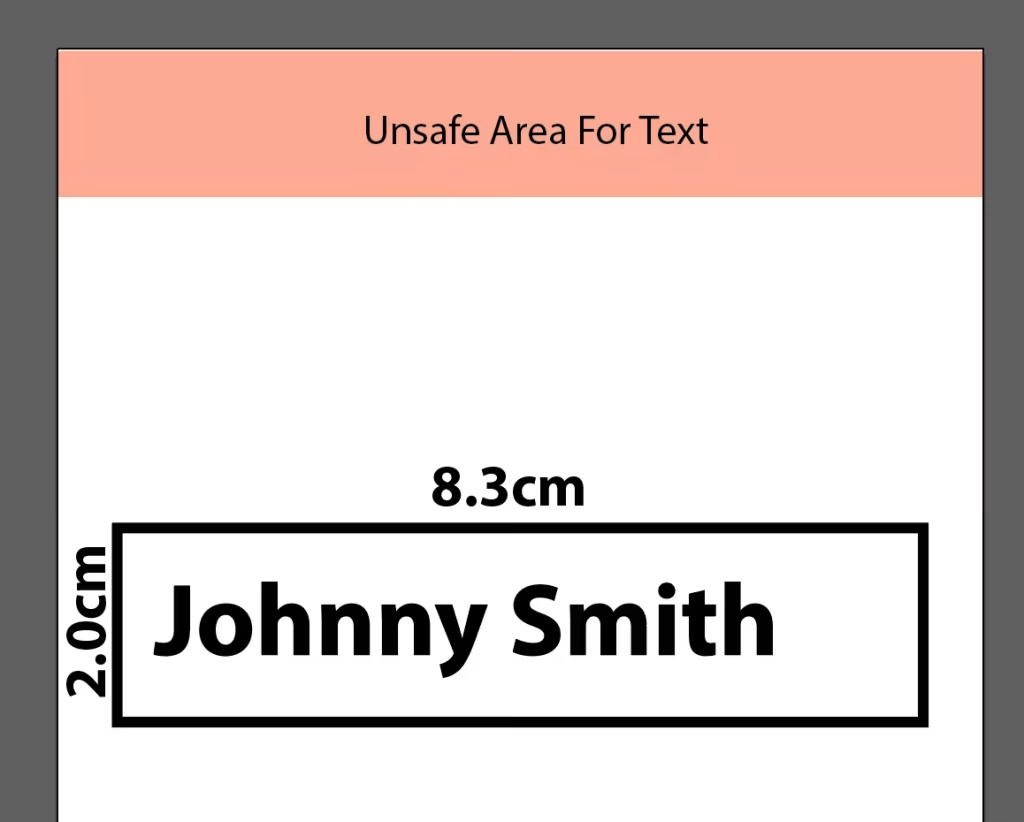
Data Sizing
The badge printing kiosk works by resizing the data into the space allocated for the data element on the badge. Imagine each data element is a ‘virtual rectangle or square’ positioned on the badge at certain co-ordinates. This rectangle might be 8cm wide and 2cm high.
In this instance, the kiosk will auto-fit the data into this virtual box. If the data length is short, the font size will be larger. If the data length is long, the font size will be smaller. It will not wrap text. See example below:
Badge design versions
You can have different design files for each main attendee role. These are:
- Attendee (default)
- Speaker
- Exhibitor
- Volunteer
- Staff
- Press
You can have only one design per role. The names of the roles can be changed on printing to a terminology that better suits your event e.g. Student instead of Attendee.
If you want different color accents between event days or between event session rotations e.g. AM and PM, this is possible. However, a print configuration file will need to be create for each rotation and loaded on to the badge printer kiosks before each check-in session.
Supplying the design file
We will need to convert your design file into a print settings configuration file. For us to do this we need two files from you.
The base image file in PNG or JPG that includes the design that will be printed on all badges that doesn’t have any variable data elements in it. For example:

And another .AI or EPS file showing the final design of a badge you’re looking to produce
