Managing sessions with Just Attend is easy. We make it simple for you to create your event agenda in minutes instead of hours.
In this guide we will show you how to properly setup and manage your event sessions.
Understanding the tracks and levels
Before we jump into the ‘how to’ you first need to understand the components that make up good session management.
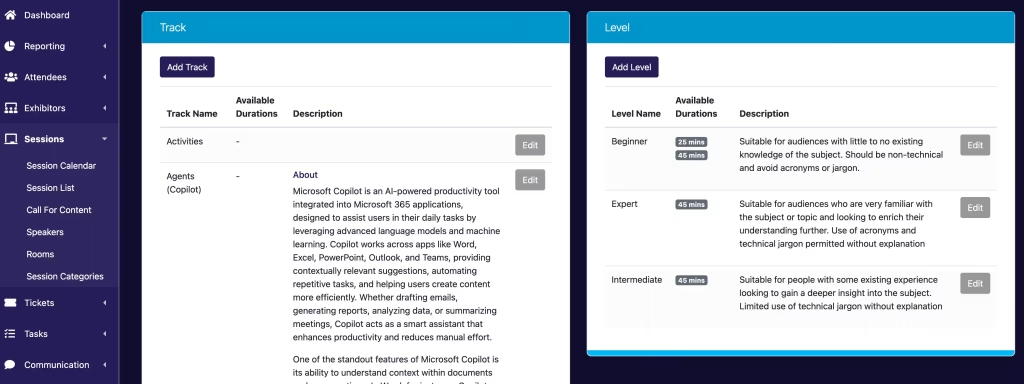
This starts with categorizing your session content. In our system we all two types of categorization:
- Track: A track is a session topic that broadly indicates what a session is about. For example, if your event is a beauty conference, you might have sessions on nail art, eyebrow care, and make-up artistry. Each one of these topics are a track.
- Level: A level is a category that indicates complexity or depth of a session. The session content within each track can be varied to appeal to different types of attendee competency. Using levels allows you to highlight which sessions within a track an attendee should consider based on their level of competency. For example, if an attendee is just starting to learn about nail care, they’ll be interested in sessions that are high-level and aimed at beginners. While a fully qualified nail technician will be interested in more in-depth sessions.
Utilizing tracks and levels to separate your session content makes it easily searchable and concise for your attendees, especially when faced with event agendas containing hundreds of sessions.
Understanding the types of sessions
We support two types of sessions:
- Session: This is the default session type. This type of session will normally have at least one speaker delivering the session. For sessions that are presentations, panel discussions, or audience Q&A, this type of session is used.
- General Session: This is a “speaker-less” session. These are sessions that are typically activity based that have no formal focal point, but rather networking opportunities. An example of a general session could be a roundtable, lunch, speed networking type sessions that promote active participation by the attendee rather than passive participation like watching someone deliver a keynote.
Understanding session delivery modes
Just Attend supports four types of session delivery modes:
- In-Person: A session that is being presented in a physical location in the present world.
- Hybrid: A session that is being presented from one location with a physical audience that also allows remote audience participation.
- Online: A session that is being presented live on the internet through a streaming service or meeting platform like Microsoft Teams or Zoom with online and remote attendees.
- On-Demand: A session that has been pre-recorded and the video is played to the attendee when it suits them.
When choosing hybrid or online sessions you have the choice of choosing the delivery method for the remote participation.
- Live Meeting: You’ll use your own Teams or Zoom meeting platform to deliver the virtual aspect of the session and embed the meeting join link into the session options.
- Live Stream: You’ll use YouTube live streaming service and share the streaming URL into the session options for the remote attendees to watch through the platform.
- Pre-Record: You’ll pre-record the session, upload it to YouTube as an unlisted video and embed the video URL into the session options.
In any of these delivery modes, the appropriate join action whether that is clicking play on an embedded video player for Live Stream and Pre-record or clicking on the Join Meeting button for a live meeting, these actions won’t be displayed to the attendee on the platform until the scheduled start time of the session.
At the end of the session, the links or the streaming player will be hidden again, unless the On-Demand option is enabled. If enabled, the join action button / player will remain visible forever.
Important: Non ticket holders cannot view on-demand or online session content. All attendees must be registered for your event and have a valid ticket.
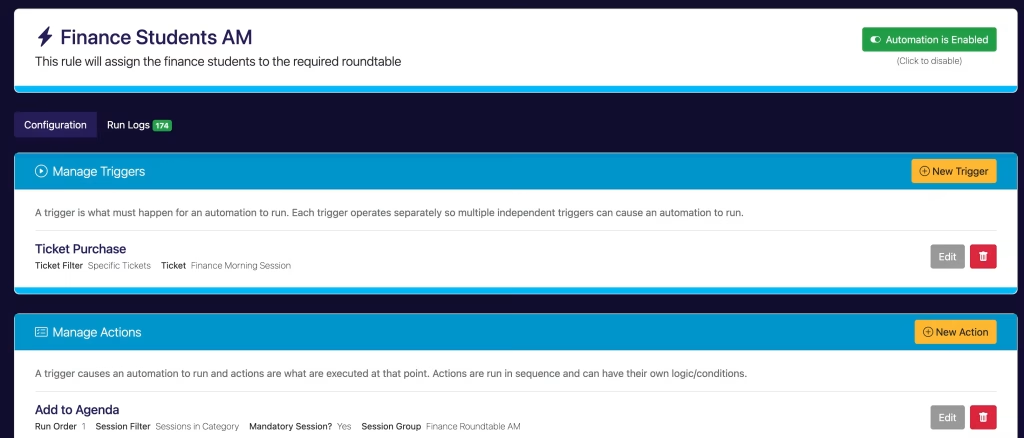
Understanding Session Groups
At your event you may have repeating sessions. A repeating session is the same session with multiple time options, a bit like the Cinema. Would you like to go to the 10am screening of Happy Gilmore 2 or the 1pm or 5:30pm?
To support repeating sessions, you must create a session group for each cluster of repeating sessions, then assign those sessions to their appropriate session group.
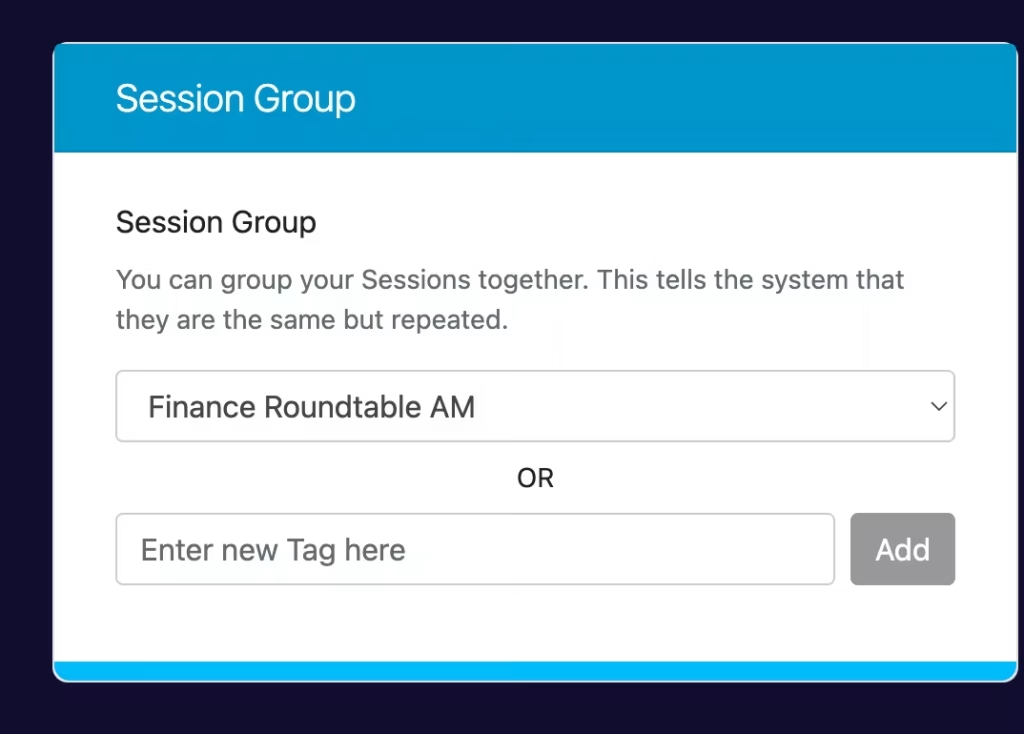
You create and assign a session group when editing an affected session.
A session can only be a member of one session group. You must create individual sessions for each repeating session time option. This is because each session could have different speakers or be scheduled in a different room and each room will have its own unique seating capacity.
Understanding session attribution
You can assign a session to an exhibitor / sponsor. This is done through session attribution. A session can be attributed to one exhibitor only.
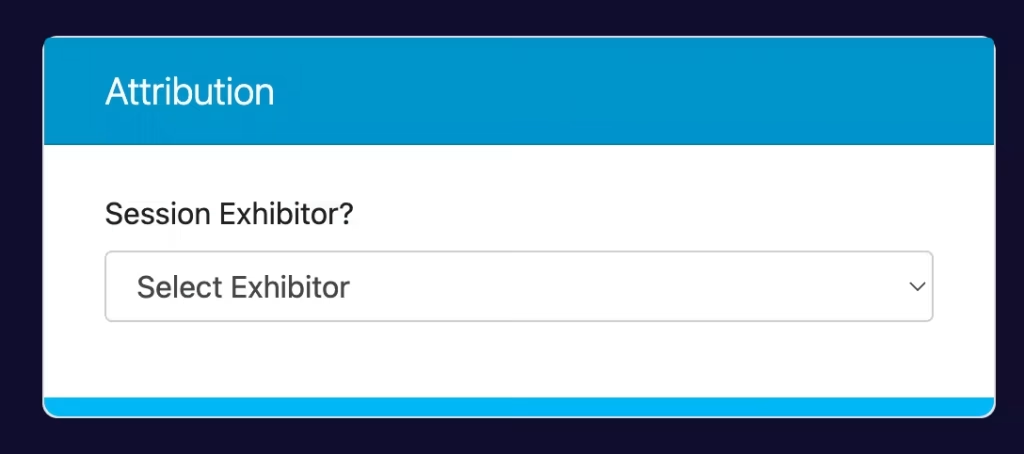
When a session is attributed to an exhibitor, the following behavior is expected:
- The assigned exhibitor will be able to edit the session entirely except for the time, date, and room the session is scheduled for and in. They will be able to edit the title, description, upload presentations, select the track and level, and add their speakers to the session
- The session will appear on their exhibitor page highlighting it
- The exhibitor logo will appear on the session description page on the agenda
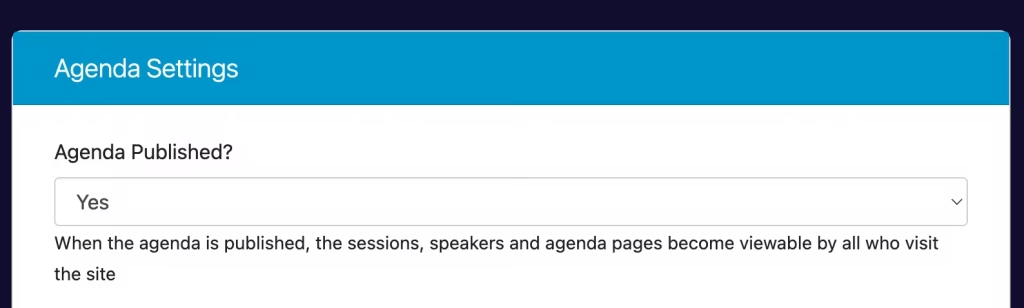
Publishing the agenda
You can choose when to publish your event agenda in Configuration > Settings.
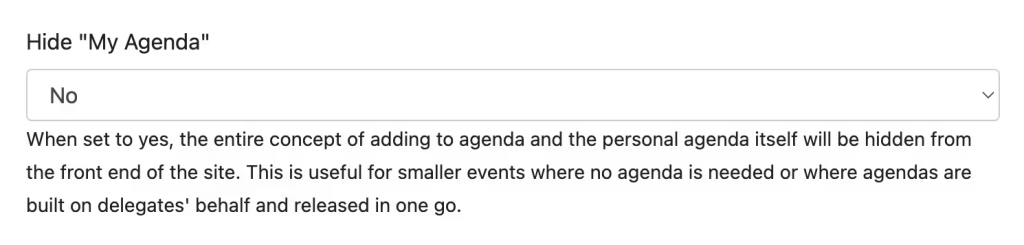
Hiding personal agendas
You can choose to hide attendee and volunteer personal agendas from their view until you’re ready. This is useful if you’re pre-assigning their agenda and don’t want to release them until a certain time.
To hide the personal agenda for attendees, go to Configuration > Settings and set “Hide My Agenda” to Yes.
The volunteer setting can be found in the volunteer settings in Configuration.
Room capacity management
Every session must be assigned to a room including virtual sessions. You can name the room as you need, but you can also configure the room seating capacity. Set this to the maximum number of seats your physical or virtual room can support.
By default, the system only monitors session reservations vs room capacities so that you can take proactive action in adjusting the rooming of sessions to suit demand. This is indicated to you in the session list using a traffic light signal approach to the count.
Should you wish to enforce room capacity, you can turn this on in Configuration > Settings and enabling ‘Enforce room capacity’ setting.
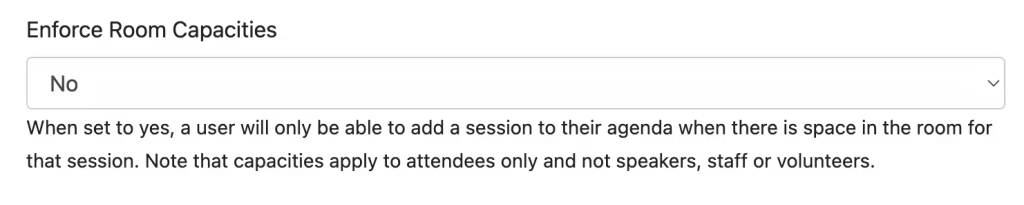
When enabled, once the number of session reservations reach the max seating capacity, the system will prevent anymore seats being reserved until capacity becomes available.
At this time we don’t have the ability for a wait list.
Managing speakers
You can add and remove speakers to sessions using the admin interface. All you need to do is enter the email address of the speaker. If they have an account on Just Attend, the search will return their account. If not, a new account will be created and the speaker will be notified.
When a speaker is added, a ticket is generated for them to your event. This ticket is a ‘Speaker’ ticket and has no cost to the speaker. They will be emailed their ticket once you have added the speaker to the session and pressed save.
They are able to login and complete their profile and registration fields. Alternatively, you can do this for them in by editing their speaker account in the event admin area.
When you remove a speaker from a session their ticket will be cancelled to the event if they aren’t speaking in any other session. If you would still like them to attend your event, they will need to register as an attendee, or you can re-register them manually in the event admin area.
When assigned, speakers will have the ability to edit their session description and upload their presentation only. They cannot edit the title, time, room, or change the track and level.
Scheduling sessions
You can schedule sessions in two ways.
- By editing each session and choosing the start and end time of the session along with its room assignment.
- By using the session calendar view that enables you to drag and drop sessions between times, rooms, and even across days.
Important: When moving sessions around on the session calendar, changes are not saved until you click the Save Changes button.
When using the session calendar, sessions are automatically color coded by track assignment to make it easier for you to distinguish if sessions in the same track are clashing with each other.
Session reservation
Attendees with a valid ticket will be able to reserve their place at a session by browsing the event agenda and clicking on the button to ‘Add session to agenda’. When doing so, the session will show in their personal agenda list on the website and mobile app. The available seat count will also reduce by one.
By default, the platform doesn’t prevent attendees from double booking onto sessions that overlap or start at the same time as each other. This allows them to hedge their bets and decide on the day which session to attend.
If your event is more capacity restricted, you can enable a setting called ‘Prevent Agenda Overlap”. This can be found in Configuration > Settings. When enabled, attendees will not be able to add more than one session in any one time period to their personal agenda, forcing them to make a single decision.

Session selection restriction
By default the system will allow attendees to add any number of sessions to their personal agenda. However, you may have a requirement that restricts attendees to picking a certain number of sessions per track to add to their agenda, for example: 1 session per track.
You can set this limit in Configuration > Settings and entering the max number of sessions into the “Maximum Agenda items per Session Category” setting.

When set to 0, this is unlimited and the restriction is essentially disabled.
Show only the sessions available based on ticket valid time
By default registered attendees will be able to see the entire event agenda when logged in and reserve their seat at any session. This is OK if the ticket they have purchased entitles them to stay at your event until the end.
However, if you offer time bound tickets, for example: morning and afternoon, or day one and day two, you may not want them to see sessions outside of their purchased ticket privilege.
To prevent sessions from showing outside of their purchased ticket entry times, in Configuration > Settings set the setting “Show sessions outside of ticket date” to No.
When set to no, the system will look a the ticket entry and exit times and display sessions that fall within that time period only.
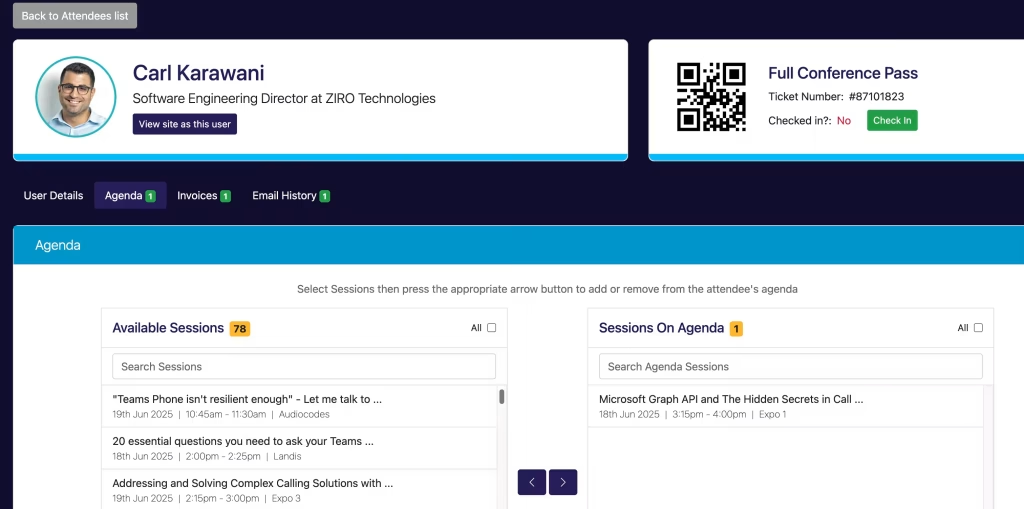
Adding sessions to an attendee’s agenda
Attendees can choose what sessions to add to their agenda. However, you as an event admin can add sessions on behalf of attendees to their personal agenda.
There are 2 ways you can do this:
Manually by finding the attendee in your attendee list, viewing their registration and then clicking on the agenda tab. Use the selectors to add and remove sessions as needed.
Automated by creating automation rules that will add sessions to their agenda when they purchase their ticket.