You can create any badge design you want. To create your badge template, you must first design it in your graphic design software such as Adobe Illustrator.
Assuming that you’ve now created it, you need to convert the design into a printer settings file. This involves editing a JSON setting file and taking measurements from your design file to find the co-ordinates for your dynamic data.
This step can be a little complicated the first time you do it, so if you need help, please log a support ticket and we can create it for you at no additional cost.
Before you begin
Before you begin you’ll need your design file open in your design software with your ruler guides visible. Some familiarity with JSON structure is required also.
You need to export your design file without any dynamic data, just the base design background you want printing on a badge to JPG or PNG.
How positioning of dynamic data works
For the printer to understand where to print the dynamic data you need to convert pixel co-ordinates from your Artboard to distance in centimeters from the top left of the badge label. This is done using an offset top and offset left parameter in the settings file. For example:
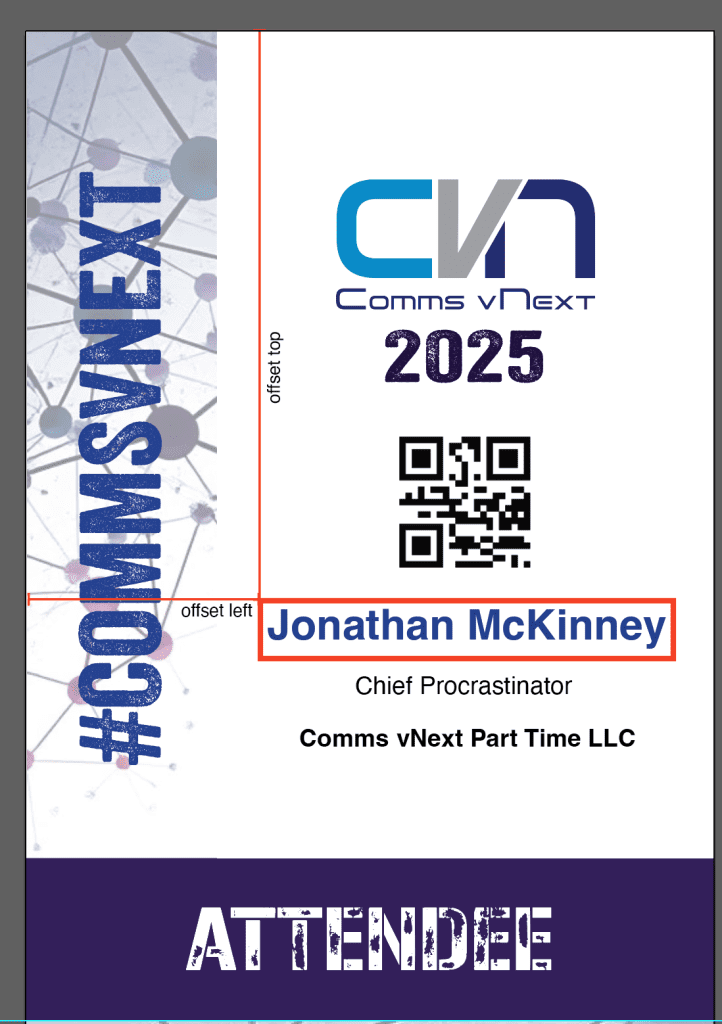
The offset top and offset left will mark the position of the top left hand corner of the dynamic data field. Next you need to specify the width and height of the dynamic data field. For example:
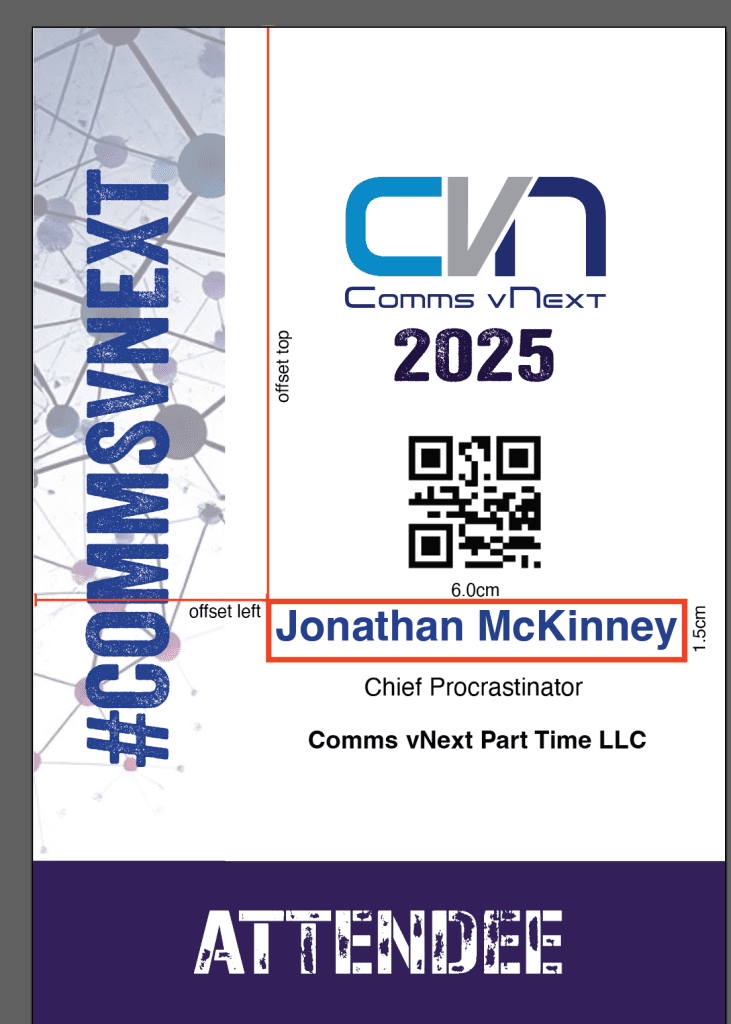
The dynamic data will print within this print area you have defined for it. It will automatically resize the data to fit into the print area, so be sure that the area is sufficiently sized to handle the data you’re expecting.
Text options
You can print the dynamic data in any font that is installed on your badge printing kiosk. If you’re using custom fonts, please install them to the C:\Windows\Fonts folder.
You can set the default font for all dynamic data, or select different fonts for each dynamic data option.
You can set any color of the font using .NET font color codes e.g. #FF[HEX CODE] where #FF denotes the opacity and the HEX code the color hex code. If you want a standard color like black or white, you can specify the english word “Black” instead of the .NET code.
            "FontColor": "#FF2777BD",
            "FontFamily": null,
            "FontAlignment": null,
            "IsBold": false,
            "IsItalic": false,
            "IsUppercase": false,
You can also print the font in regular, bold, or italic options.
Text alignment within the dynamic data field can be specified (default: center).
The text dynamic data field and font color can also be inverted. When inverted, the text color becomes the background color of the dynamic field and you can specify an alternate text color

To invert a dynamic data field set the key invertText to true : “invertText”: true
To set a different font color, add the color to the InvertedFontColor key: “InvertedFontColor”: “#FF56FGH”
Mirrored or un-mirrored print
Mirrored printing means the same design for the front side of the badge is mirrored onto the back side of the badge. In this mode, you only need to design and position the front side of the badge’s dynamic data. The system will take that and flip it on to the reverse side using the same measurements.
You can account for the ‘fold gap’ by adding an middle offset.
Un-mirrored print (the default) you’ll need to design the whole badge and position the dynamic data on the rear side and rotate / flip it upside down.
When doing so, the offset top measurement is taken from the top of the badge to the bottom right hand corner of the dynamic data as you would look at it in a finished and proper orientated dimension. Example below:
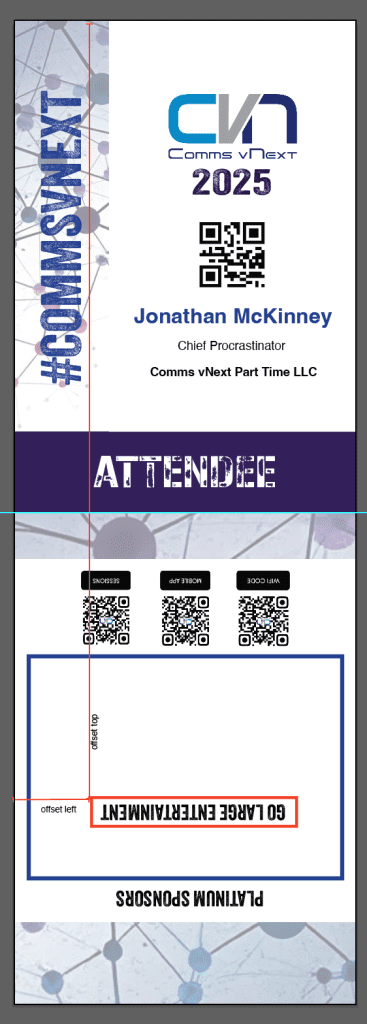
When setting the height of the dynamic data field, this will be the height down from the start point towards the bottom edge of the badge.
Calculating the positioning of stacked dynamic data
An example of stacked dynamic data is when you have the name, job title, and company name underneath each other.

When calculating where the dynamic data should be placed add together the top offset of the preceding dynamic data field + it’s field height + required gap space.
For example, if the DisplayName above is 5.5cm from the top of the badge, it’s dynamic field is 1.5cm high, and you want 5mm of space between it and the job title field, you would need to add 5.5 + 1.5 + 0.5 together giving you a top offset value of 7.5cm for the job title field position.
Custom text and QR codes
You can add custom text as string data or encoded into 2D QR codes to badges. This data is static per badge role. This means all attendees with the same type of badge will have the same custom text or QR code printed on their badge.
A use case for this might be venue WIFI code or a special discount offer only available to a certain role of attendee. For example:
"CustomData": [
            {
                "offsetTop": 4.0,
                "offsetLeft": 10.0,
                "height": 3.0,
                "width": 8.0,
                "invertText": false,
                "data": "WIFI Name: Just Attend, WIFI Code: 123456789",
                "FontColor": null,
                "FontFamily": null,
                "FontAlignment": null,
                "IsUppercase": false,
                "InvertedFontColor": null
            },
            {
                "offsetTop": 4.0,
                "offsetLeft": 10.0,
                "height": 3.0,
                "width": 8.0,
                "invertText": false,
                "data": "Discount Code: ABVCDR",
                "FontColor": null,
                "FontFamily": null,
                "FontAlignment": null,
                "IsUppercase": false,
                "InvertedFontColor": null
            }
        ]
Keep adding your custom data objects within the same array.
A QR code without any specified data will print the attendee’s ticket number as the QR Code on the badge.
"QrCodes": [
                {
                "qrCodeIdentifier": "1",
                "offsetTop": 3.4,
                "offsetLeft": 3.1,
                "width": 1.95,
                "data": null,
                "showMirrorImage": false
                },
                {
                "qrCodeIdentifier": "2",
                "offsetTop": 3.4,
                "offsetLeft": 3.1,
                "width": 1.95,
                "data": "https://yourwebsite.com",
                "showMirrorImage": false
                },
                {
                "qrCodeIdentifier": "3",
                "offsetTop": 3.4,
                "offsetLeft": 3.1,
                "width": 1.95,
                "data": "app:\\badgescanner\\{ticket_number}",
                "showMirrorImage": false
                }
            ]
In the above example, QR code 1 will print the attendee’s ticket number encoded in a QR code e.g. 7123456789. QR Code 2 will encode “https://yourwebsite.com” into a QR code, and QR Code 3 will prefix an app URL to the ticket number so that when scanned it will launch your lead scanning app for example.
Setting different badge designs for each role
If you want a different badge design for each of the following roles:
- Speaker
- Exhibitor
- Volunteer
- Staff
- Press
You must include them in the CustomBadgeStyles array in the settings file. The default badge style will print for attendees and any role than cannot be matched to a custom badge style.
Example:
"CustomBadgeStyles": [
        {
            "Role": "Exhibitor",
            "FontFamily": null,
            "FontColor": null,...
        },
        {
            "Role": "Speaker",
            "FontFamily": null,
            "FontColor": null,...
        },
        {
            "Role": "Volunteer",
            "FontFamily": null,
            "FontColor": null,...
        }
     ]
Creating the Settings File
Please download the all settings JSON template file
This file will not print a legible badge. Please use it only as an object reference.
Create a file called printsettingsv2.json
You can create this in notepad or similar application.
Setting up the paper size and print options
The first part of the file will set the badge label options. This will assume all badges are the same size and the print behavior is the same.
| Parameter | Example and description |
|---|---|
| Height | e.g. 27.4 – the height of the complete unfolded badge label in centimeters |
| Width | e.g. 9.53 – the width of the complete unfolded badge label in centimeters |
| printCount | set to 1 unless you want more than one badge printed at the same time |
| mirrorPrint | Set to true if you want the same data printed on both sides of the badge. Set to false if you want different data printed on the back or just one sided print. |
| mirrorPrintTopOffset | Set to 0 (default) if you don’t want a gap on the badge fold |
| mirrorPrintLeftOffset | Set to 0 (default) if you don’t want a different alignment of data on the reverse side |
| FontFamily | The name of the font as displayed in C:\Windows\Fonts e.g. “Arial” |
| FontColor | The color of the default font e.g. “Black” or “#FF4568FD” |
| Terminology | If you want to override the default names given to the badge role, enter them here. |
{
    "height": 30.0,
    "width": 20.2,
    "printCount": 1,
    "mirrorPrint": true,
    "mirrorPrintTopOffset": 1.0,
    "mirrorPrintLeftOffset": 0.0,
    "FontFamily": null,
    "FontColor": null,
    "EventName": "Test Event",
    "terminology": [
        {
            "Key": "Delegate",
            "Value": "Attendee"
        },
        {
            "Key": "Speaker",
            "Value": "Speaker"
        },
        {
            "Key": "Exhibitor",
            "Value": "Exhibitor"
        },
        {
            "Key": "Staff",
            "Value": "Staff"
        },
        {
            "Key": "Volunteer",
            "Value": "Volunteer"
        },
        {
            "Key": "Press",
            "Value": "Press"
        }
    ],...}
Dynamic data field keys
The following table lists out all the dynamic fields you can print
| Dynamic Field Key | Type | Description |
|---|---|---|
| BadgeLabel | Object | Will print the role name of the badge as found in the system and use the terminology values e.g. “Attendee”, “Speaker”… |
| DisplayName | Object | Will print the first name and last name of the attendee in one string |
| FirstName | Object | Will print the first name only of the attendee |
| LastName | Object | Will print the last name only of the attendee |
| CompanyName | Object | Will print the company name of the attendee |
| JobTitle | Object | Will print the job title of the attendee |
| EventName | Object | Will print the name of the event as found in the system unless overridden in the EventName key |
| TicketName | Object | Will print the ticket name issued to the attendee |
| TicketFromDate | Object | Will print the valid from date of the ticket |
| TicketToDate | Object | Will print the date the ticket validity ends |
| EventLogo | Object | Will print the event logo as uploaded to your event |
| CustomData | Array | Will print any custom data text you need per role |
| QrCodes | Array | Contains the QR codes to print on the badge |
| AgendaItemTable | Object | Table of agenda items found on the attendee’s personal agenda |
| ExhibitorLevel | Object | Prints the Exhibitor Level Name assigned to the user. |
| CustomField[1-10] | Object | Will print the text data stored in custom fields 1-10 use “customField1”, “customField2” etc. |
These can be positioned anywhere on the badge.
Object customization
Each object can be customized for their position and format using the following key values.
| Key | Value | Description |
|---|---|---|
| OffsetTop | 5.5 | The distance in centimeters from the top of the badge label to the top left hand corner of the dynamic field |
| OffsetLeft | 0.5 | The distance in centimeters from the left edge of the badge label to the left edge of the dynamic field |
| height | 2.0 | The height in centimeters of the dynamic data field |
| width | 6.0 | The width in centimeters of the dynamic data field |
| invertText | true or false (default) | When set to true, the background of the dynamic data field will be printed in the font color |
| data | only used for customData or QR Codes | Text string to print out onto the badge |
| FontColor | “Black” or “#FF6757DA” | The color of the text to be printed (or the color of the field background if invertText = true) |
| FontFamily | null (default) or “Arial” | When set to null the default font will be used. Set to name of font if another is to be used |
| FontAlignment | null, “left”, “right”, “center” | When set to null, the text is centered within the dynamic field width. |
| IsBold | true or false (default) | When set to true will use the bold variant of the font |
| IsItalic | true or false (default) | When set to true will us italic font |
| IsUpperCase | true or false (default) | When set to true the text will be printed CAPITALIZED |
| InvertedFontColor | null (default), “Black” or “#FF3456GF” | When set will print the text color when invertText set to true |
| RotationAngle | integer | Angle of the test to be printed. e.g. 90 or -90 degrees |
Badge Styling
The badge styling is encapsulated in two keys “DefaultBadgeStyle” and “CustomBadgeStyles” which is an array.
"DefaultBadgeStyle": {...},
"CustomBadgeStyles": [{...},{...},{...}]
All styling and customization of each badge must be placed within the {}.
Badge styling keys
| Key | Value | Description |
|---|---|---|
| Role | null (defaultbadge), Speaker, Exhibitor, Volunteer, Staff, Press | The role name that determines which badge to print |
| FontFamily | null (default), “Arial” etc | The font name for the text to be used for the dynamic data belonging to this badge role |
| FontColor | null (default), “Black” or “#FF5645FF” | The default font color to print for this badge role |
| BackgroundImage | “C:\\Folder\\Background.jpg” | The file location for the image file to be used to print the base design image |
When using backslashes ‘\’ in JSON you’ll need to escape them by using double-backslash ‘\\’.
Example badge data object:
"DefaultBadgeStyle": {
        "Role": null,
        "FontFamily": null,
        "FontColor": null,
        "BackgroundImage": "https://images.wallpapersden.com/image/wxl-4k-cool-2020-art_72061.jpg",
        "BadgeLabel": {
            "offsetTop": 12.0,
            "offsetLeft": 10.0,
            "height": 2.0,
            "width": 10.0,
            "invertText": true,
            "data": null,
            "FontColor": "Yellow",
            "FontFamily": null,
            "IsBold": false,
            "IsItalic": false,
            "FontAlignment": null,
            "IsUppercase": false,
            "InvertedFontColor": "Blue"
        },
        "DisplayName": {
            "offsetTop": 2.0,
            "offsetLeft": 1.0,
            "height": 1.0,
            "width": 4.0,
            "invertText": false,
            "data": null,
            "FontColor": "#FF2777BD",
            "FontFamily": null,
            "IsBold": false,
            "IsItalic": false,
            "FontAlignment": null,
            "IsUppercase": false,
            "InvertedFontColor": null
        },
        "FirstName": {
            "offsetTop": 2.0,
            "offsetLeft": 1.0,
            "height": 1.0,
            "width": 4.0,
            "invertText": false,
            "data": null,
            "FontColor": "#FF2777BD",
            "FontFamily": null,
            "IsBold": false,
            "IsItalic": false,
            "FontAlignment": null,
            "IsUppercase": false,
            "InvertedFontColor": null
        },
        "LastName": {
            "offsetTop": 2.0,
            "offsetLeft": 6.0,
            "height": 1.0,
            "width": 4.0,
            "invertText": false,
            "data": null,
            "FontColor": null,
            "FontFamily": null,
            "IsBold": false,
            "IsItalic": false,
            "FontAlignment": "right",
            "IsUppercase": true,
            "InvertedFontColor": "#FF56FGH"
        },
        "CompanyName": {
            "offsetTop": 3.0,
            "offsetLeft": 1.0,
            "height": 1.0,
            "width": 4.0,
            "invertText": false,
            "data": null,
            "FontColor": "Pink",
            "FontFamily": "Comic Sans MS",
            "FontAlignment": "center",
            "IsUppercase": false,
            "InvertedFontColor": null
        },
        "JobTitle": {
            "offsetTop": 3.0,
            "offsetLeft": 6.0,
            "height": 1.0,
            "width": 4.0,
            "invertText": false,
            "data": null,
            "FontColor": null,
            "FontFamily": null,
            "IsBold": false,
            "IsItalic": false,
            "FontAlignment": null,
            "IsUppercase": false,
            "InvertedFontColor": null
        },
        "EventName": {
            "offsetTop": 0.0,
            "offsetLeft": 10.0,
            "height": 1.0,
            "width": 4.0,
            "invertText": false,
            "data": null,
            "FontColor": null,
            "FontFamily": null,
            "IsBold": false,
            "IsItalic": false,
            "FontAlignment": null,
            "IsUppercase": false,
            "InvertedFontColor": null
        },
        "TicketName": {
            "offsetTop": 11.0,
            "offsetLeft": 10.0,
            "height": 1.0,
            "width": 4.0,
            "invertText": false,
            "data": null,
            "FontColor": null,
            "FontFamily": null,
            "IsBold": false,
            "IsItalic": false,
            "FontAlignment": null,
            "IsUppercase": false,
            "InvertedFontColor": null
        },
        "TicketFromDate": {
            "offsetTop": 4.0,
            "offsetLeft": 1.0,
            "height": 1.0,
            "width": 4.0,
            "invertText": false,
            "data": null,
            "FontColor": null,
            "FontFamily": null,
            "IsBold": false,
            "IsItalic": false,
            "FontAlignment": null,
            "IsUppercase": false,
            "InvertedFontColor": null
        },
        "TicketToDate": {
            "offsetTop": 4.0,
            "offsetLeft": 6.0,
            "height": 1.0,
            "width": 4.0,
            "invertText": false,
            "data": null,
            "FontColor": null,
            "FontFamily": null,
            "IsBold": false,
            "IsItalic": false,
            "FontAlignment": null,
            "IsUppercase": false,
            "InvertedFontColor": null
        },
        "EventLogo": {
            "offsetTop": 4.0,
            "offsetLeft": 8.0,
            "height": 10.0,
            "width": 10.0,
            "invertText": false,
            "data": null,
            "FontColor": null,
            "FontFamily": null,
            "FontAlignment": null,
            "IsUppercase": false,
            "InvertedFontColor": null
        },
        "ExhibitorLogo": {
            "offsetTop": 5.0,
            "offsetLeft": 5.0,
            "height": 5.0,
            "width": 5.0,
            "invertText": false,
            "data": null,
            "FontColor": null,
            "FontFamily": null,
            "FontAlignment": null,
            "IsUppercase": false,
            "InvertedFontColor": null
        },
        "CustomData": [
            {
                "offsetTop": 4.0,
                "offsetLeft": 10.0,
                "height": 3.0,
                "width": 8.0,
                "invertText": false,
                "data": "Custom Text 1!",
                "FontColor": null,
                "FontFamily": null,
                "FontAlignment": null,
                "IsBold": false,
                "IsItalic": false,
                "IsUppercase": false,
                "InvertedFontColor": null
            },
            {
                "offsetTop": 4.0,
                "offsetLeft": 10.0,
                "height": 3.0,
                "width": 8.0,
                "invertText": false,
                "data": "Custom Text 2!",
                "FontColor": null,
                "FontFamily": null,
                "FontAlignment": null,
                "IsBold": false,
                "IsItalic": false,
                "IsUppercase": false,
                "InvertedFontColor": null
            }
        ],
        "QrCodes": [{
                "offsetTop": 7.0,
                "offsetLeft": 0.25,
                "width": 6,
                "data": "custom data here",
                "isMirrorImage": false
             },
             {"offsetTop": 7.0,
                "offsetLeft": 0.25,
                "width": 6,
                "data": null,
                "isMirrorImage": false
             }
        ],
        "AgendaItemTable": {
            "offsetTop": 17.3,
            "offsetLeft": 1.0,
            "width": 7.5,
            "height": 6,
            "rowHeight": 15,
            "spaceBetweenRows": 10,
            "borderColor": "#FFCFB87C",
            "borderWidth": 2,
            "innerBorderColor": "#FFCFB87C",
            "innerBorderWidth": 1,
            "headerBackground": "#FFCFB87C",
            "headerColor": "Black",
            "fontColor": null,
            "fontFamily": null,
            "fontSize": 10,
            "showMirrorImage": true,
            "includeTitle": true,
            "titleHeaderName": "Session",
            "titleRelativeWidth": 4,
            "includeStartDate": true,
            "startDateHeaderName": "Time",
            "startDateFormat": "h tt",
            "startDateRelativeWidth": 1,
            "includeEndDate": false,
            "endDateHeaderName": "End",
            "endDateFormat": "h tt ",
            "endDateRelativeWidth": 1,
            "includeRoomName": true,
            "roomNameHeaderName": "Room",
            "roomNameRelativeWidth": 2
        }
    }
Adding your print settings file to the kiosk
Once you have your printsettingsv2.json file saved, copy it to the following location on the check-in kiosk “%appdata%\roaming\justattendkiosk”.
Be sure to copy the background image files for your badges to the kiosk as well and update the printsettingsv2 file with their location if different.
Launch the Just Attend kiosk application.
If you need to make changes to the file, edit the file and save it, but be sure to quit the Just Attend Kiosk app and relaunch it so that the new settings file is picked up and loaded.
Tip: It is recommended your first few prints to be done to PDF writer on your kiosk machine. It will never be 100% correct on your first print and may take a few small alterations to get the print out you’re looking for. By printing to PDF, you’ll get to see the output without wasting ink and labels. Only send to print when you are happy the output is as you expect.
We appreciate this article is a mouthful and quite complicated. We do offer a free design service and when you use our print media, we will ensure that the printsettings file we give you will be perfect first time. We will even send you physical proofs!
