
The badge printing kiosks can print badges in bulk in admin mode. This is useful if you want to print off your speaker badges for instance in advance.
Before you can bulk print
Before you can bulk print effectively it is important that your attendee data is structured to support how you want to bulk print.
With bulk printing you can only print attendees who have a particular ticket and have a particular attendee role.
There are 6 roles that can be selected:
- Attendee
- Speaker
- Exhibitor
- Press
- Volunteer
- Staff
An attendee must have one of these roles for their badge to be printed.
In addition, an attendee must have at least one ticket assigned to them in the system. Once they have at least one ticket and one role, they can be bulk printed.
To change tickets or roles, you can do this from the edit user option in the event portal. Alternatively, uploading them by CSV with the correct role will also work.
How to bulk print
Launch the kiosk into admin mode and click on Bulk Ticket Printing. The following screen will appear.
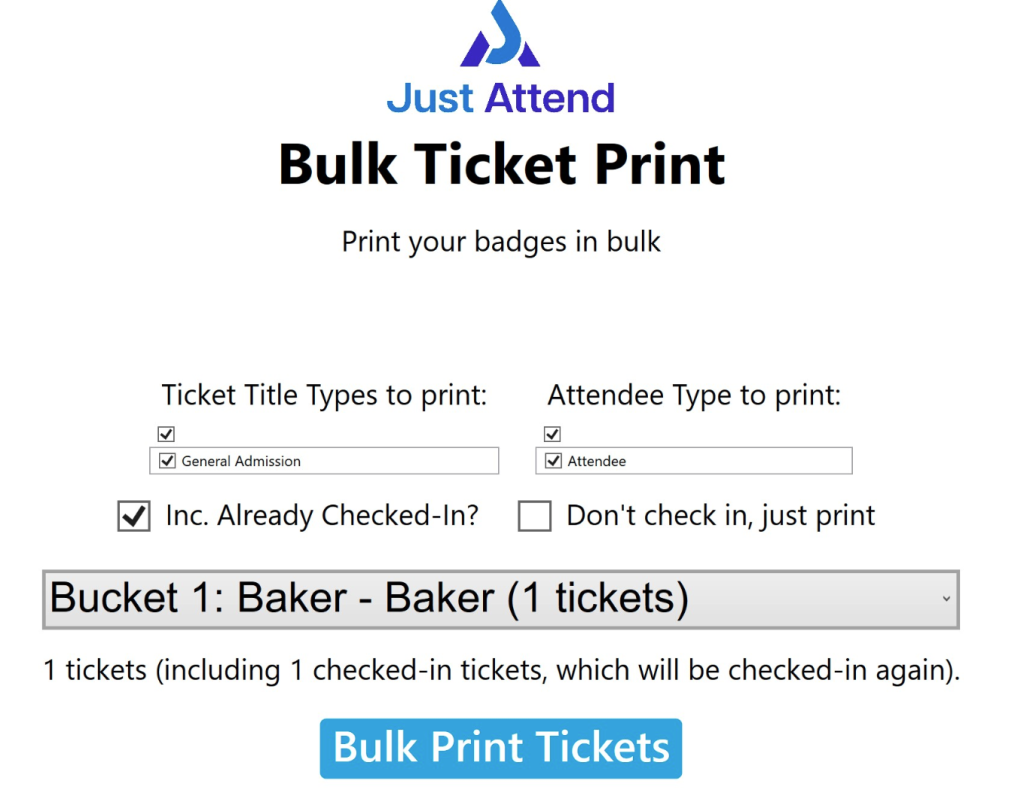
The 2 filters are an AND, not an OR.
To print the badges you want, first select the ticket(s), then the role(s) of the attendees who have the ticket(s) you want to print.
If you want to print badges that may have already been printed, check the Inc. Already Checked-In checkbox.
The matching attendees will be grouped into buckets of 10. You will need to print each bucket in turn. The limit is 10 to avoid unnecessary waste if something goes wrong in the bulk printing process. By only printing 10 at a time the worst case is you’re going to have 10 wasted badges and not 500. You can then fix the problem and carry on from where you left off.
The purpose of roles
The main purpose of roles is so you can print different badge designs based on the role assigned to the user.
How to structure your attendee imports for bulk printing
This is an important decision before you import your attendees as getting it wrong at the beginning will affect your ability to bulk print badges for certain groups.
Case 1: Same badge design for everyone but you want to bulk print VIP attendees.
In this scenario you don’t need to use roles to determine who is a VIP or not. In the event portal create a ticket called “VIP” and a ticket called “Attendee”.
When bulk uploading attendees by CSV, create 2 CSVs for import. One containing your VIPs and the other containing normal Attendees.
Upload the VIPs and create a list called “VIPs”. Once imported into the VIP list, go to the VIP list and then select Actions > Register For Event. Then from the event select the ticket “VIP”.
Now upload the Attendees to a list called “Attendees”. Once imported, go to the Attendees list and then register them using the Attendee ticket.
If adding an adhoc attendee in the event portal, select Add Attendee and then choose the VIP ticket or the Attendee ticket depending on the type of Attendee you’re adding.
If editing an existing Attendee, simply add the correct ticket to their account and remove the old one and press save.
Now you can bulk print VIPs by going into the bulk print feature and select the “VIP” ticket and the “Attendee” role.
This will print all the VIPs in alphabetical order.
Case 2: Different badge designs based on the role of the attendee
In this scenario you must have different badge designs based on whether a user is an Attendee or Speaker for example.
You don’t need to create separate tickets in this case (unless you need the ticket name printed on the badge), but you do need to assign the appropriate role to the person as you add them
Unlike Case 1, you don’t need to create separate lists or CSV files with attendees with the appropriate roles listed together. You can do this in one CSV file.
When uploading, modify your CSV file role column and assign the appropriate role to each user.
The supported options are:
- attendee
- speaker
- exhibitor
- volunteer
- press
- staff
Then once saved, upload the CSV and register them for the event under one list.
If you need to make manual changes you can do this in the event portal by editing the user and changing their role.
Now you’ll be able to bulk print all attendees of a ticket that have the role you have selected for print.